Images
To make sure your artwork looks great on all devices you support, learn how the system displays content on the screen and how to deliver art at the appropriate scale factors.
Scale factors
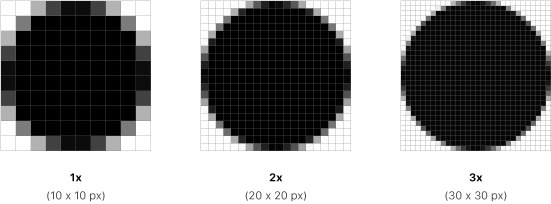
All platforms use a coordinates system based on measurements in points, which map to pixels in the display. A standard-resolution display has a 1:1 pixel density (also called @1x), where one pixel is equal to one point. High-resolution displays have a higher pixel density, such as 2:1 or 3:1. A 2:1 density (called @2x) has a scale factor of 2, and a 3:1 density (called @3x) has a scale factor of 3. Because of higher pixel densities, high-resolution displays demand images with more pixels.
Formats
As you create different types of images, consider the following recommendations.
| Image type | Format |
|---|---|
| Bitmap or raster work | De-interlaced PNG files |
| PNG graphics that don't require full 24-bit color | An 8-bit color palette |
| Photos | JPEG files, optimized as necessary, or HEIC files |
| Flat icons, interface icons, and other flat artwork that requires high-resolution scaling | PDF or SVG files |
Best practices
Supply high-resolution images for all artwork in your app, for every device you support. You accomplish this by multiplying the number of pixels in each image by a specific scale factor. As you add each image to your project’s asset catalog, identify its scale factor by appending “@1x,” “@2x,” or “@3x” to its filename. Use the following values for guidance; for additional scale factors, see Layout.
| Platform | Scale factors |
|---|---|
| iOS | @2x and @3x |
| iPadOS | @2x |
| macOS, tvOS | @1x and @2x |
| watchOS | @2x |
In general, design images at the lowest resolution and scale them up to create high-resolution assets. When you use resizable vectorized shapes, you might want to position control points at whole values so that they’re cleanly aligned at 1x. This positioning allows the points to remain cleanly aligned to the raster grid at higher resolutions, because 2x and 3x are multiples of 1x. In contrast, there are times when you don’t want to keep a shape perfectly aligned to the raster grid; for example, aligning a circle to the grid can make it appear flattened at the top and bottom.
Include a color profile with each image. Color profiles help ensure that your app’s colors appear as intended on different displays. For guidance, see Color management.
Always test images on a range of actual devices. An image that looks great at design time may appear pixelated, stretched, or compressed when viewed on various devices.
Platform considerations
No additional considerations for iOS, iPadOS, or macOS.
tvOS
Layered images are at the heart of the Apple TV user experience. The system combines layered images, transparency, scaling, and motion to produce a sense of realism and vigor that evokes a personal connection as people interact with onscreen content.
Parallax effect
Parallax is a subtle visual effect the system uses to convey depth and dynamism when an element is in focus. As an element comes into focus, the system elevates it to the foreground, gently swaying it while applying illumination that makes the element's surface appear to shine. After a period of inactivity, out-of-focus content dims and the focused element expands.
Layered images are required to support the parallax effect.
Layered images
A layered image consists of two to five distinct layers that come together to form a single image. The separation between layers, along with use of transparency, creates a feeling of depth. As someone interacts with an image, layers closer to the surface elevate and scale, overlapping lower layers farther back and producing a 3D effect.
IMPORTANT Your tvOS app icon must use a layered image. For other focusable images in your app, including Top Shelf images, layered images are strongly encouraged, but optional.
Use standard interface elements to display layered images. If you use standard views and system-provided focus APIs — such as FocusState — layered images automatically get the parallax treatment when people bring them into focus.
Identify logical foreground, middle, and background elements. In foreground layers, display prominent elements like a character in a game, or text on an album cover or movie poster. Middle layers are perfect for secondary content and effects like shadows. Background layers are opaque backdrops that showcase the foreground and middle layers without upstaging them.
Generally, keep text in the foreground. Unless you want to obscure text, bring it to the foreground layer for clarity.
Keep the background layer opaque. Using varying levels of opacity to let content shine through higher layers is fine, but your background layer must be opaque — you’ll get an error if it’s not. An opaque background layer ensures your artwork looks great with parallax, drop shadows, and system backgrounds.
Keep layering simple and subtle. Parallax is designed to be almost unnoticeable. Excessive 3D effects can appear unrealistic and jarring. Keep depth simple to bring your content to life and add delight.
Leave a safe zone around your content. During focus and parallax, content around the edges of some layers may be cropped or difficult to see clearly as the image scales and moves. To ensure that your primary content is always visible, don’t put it too close to the edges. Be aware that the safe zone can vary, depending on the image size, layer depth, and motion, and that foreground layers are cropped more than background layers.
![]()
Always preview layered images. To ensure your layered images look great on Apple TV, preview them throughout your design process using Xcode, the Parallax Previewer app for macOS, or the Parallax Exporter plug-in for Adobe Photoshop. Pay special attention as scaling and clipping occur, and readjust your images as needed to keep important content safe. After your layered images are final, preview them on an actual TV for the most accurate representation of what people will see. To download Parallax Previewer and Parallax Exporter, see Resources.
Use both the unfocused and focused states to determine the appropriate size for a layered image. During the parallax effect, the system may crop background layers slightly, so keep essential content within a safe zone and include some additional space to make sure your content looks good.
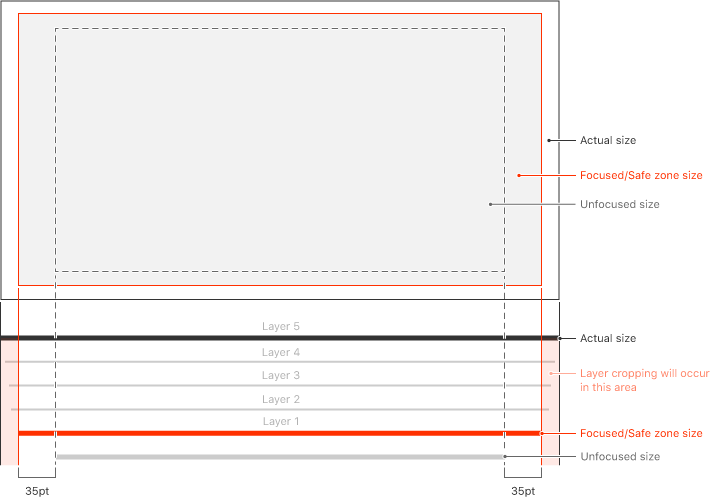
The following formulas can help you calculate sizing for a layered image based on the size of the image when it’s not in focus.
| Image side | Focused/Safe zone size | Actual size |
|---|---|---|
| Longest | Length of longest unfocused side + 70 pt | Length of longest focused side x 106% |
| Shortest | Proportional based on longest side | Proportional based on longest side |
You can embed layered images in your app or retrieve them from a content server at runtime. To create layered images for inclusion within your app, use one of the following tools:
- Parallax Previewer app for macOS. Parallax Previewer can import PNG files to serve as individual layers, layered images (
.lsr) created with the Parallax Exporter plug-in, and layered Photoshop images (.psd). Parallax Previewer can export LSR files that you can import directly into an Xcode project. - Parallax Exporter Adobe Photoshop plug-in. Use this plug-in to test your layered images in Photoshop and export them as LSR files that you can import directly into an Xcode project.
- Xcode. Drag standard PNG files into your app’s asset catalog to serve as individual layers of an image stack in Xcode. Image stacks can be exported as LSR files. Xcode can also import LSR files.
If your app retrieves layered images from a content server at runtime, you must provide those images in runtime layered image (.lcr) format. You don’t create runtime layered images directly; you generate them from LSR files or Photoshop files using the layerutil command-line tool that Xcode provides. Runtime layered images are intended to be downloaded — don’t embed them within your app.
watchOS
In general, avoid transparency to keep image files small. If you always composite an image on the same solid background color, it’s more efficient to include the background in the image. However, transparency is necessary in complication images, menu icons, and other interface icons that serve as template images, because the system uses it to determine where to apply color.
Use autoscaling PDFs to let you provide a single asset for all screen sizes. Design your image for the 40mm and 42mm screens at 2x. When you load the PDF, WatchKit automatically scales the image based on the device’s screen size, using the values shown below:
| Screen size | Image scale |
|---|---|
| 38mm | 90% |
| 40mm | 100% |
| 41mm | 106% |
| 42mm | 100% |
| 44mm | 110% |
| 45mm | 119% |
| 49mm | 119% |
