Augmented reality
Augmented reality (or AR) lets you deliver immersive, engaging experiences that seamlessly blend virtual objects with the real world.


Using the device's camera to present the physical world onscreen live, your app superimposes three-dimensional virtual objects, creating the illusion that these objects actually exist. Depending on the experiences your app offers, people can reorient the device to explore the objects from different angles, interact with objects using gestures and movement, and even join other people in multiuser AR experiences. For developer guidance, see ARKit.
Offer AR features only on capable devices. If your app's primary purpose is AR, make your app available only to devices that support ARKit. If your app includes features that require specific AR capabilities, or if AR features are optional in your app, don’t show people an error if they try to use these features on a device that doesn’t support them; instead, simply avoid offering the feature on an unsupported device. For developer guidance, see Verifying device support and user permission.
Creating an engaging, comfortable experience
Let people use the entire display. Devote as much of the screen as possible to displaying the physical world and your app's virtual objects. Avoid cluttering the screen with controls and information that diminish the immersive experience.
Strive for convincing illusions when placing realistic objects. Design detailed 3D assets with lifelike textures to create objects that appear to inhabit the physical environment in which you place them. Using information from ARKit, you can scale objects properly and position them on detected real-world surfaces, reflect environmental lighting conditions and simulate camera grain, cast top-down diffuse object shadows on real-world surfaces, and update visuals as the camera's position changes. To help avoid breaking the illusion you create, make sure your app updates scenes 60 times per second so objects don’t appear to jump or flicker.
Consider how virtual objects with reflective surfaces show the environment. Reflections in ARKit are approximations based on the environment captured by the camera. To help maintain the illusion that an AR experience is real, prefer small or coarse reflective surfaces that downplay the effect of these approximations.
Use audio and haptics to enhance the immersive experience. A sound effect or bump sensation is a great way to confirm that a virtual object has made contact with a physical surface or other virtual object. Background music can also help envelop people in the virtual world. For guidance, see Playing audio and Playing haptics.
Minimize text in the environment. Display only the information that people need for your app experience.
If additional information or controls are necessary, consider displaying them in screen space. Content in screen space appears fixed to a consistent location either in the virtual world or, less commonly, on the device screen. It’s typically easy for people to find and view content in screen space because it remains stationary while the underlying AR environment moves with the device.
Consider using indirect controls when you need to provide persistent controls. Indirect controls are not part of the virtual environment — instead, they are 2D controls displayed in screen space. If people need access to persistent controls in your app, consider placing the controls so that people don’t have to adjust how they're holding the device to reach them. Also, consider using translucency in an indirect control to help avoid blocking the underlying scene. For example, the Measure app uses screen space to display a mix of translucent and opaque controls that people use to measure objects in the real world.

Anticipate that people will use your app in a wide variety of real-world environments. People may open your app in a place where there isn't much room to move around or there aren't any large, flat surfaces. Clearly communicate your app's requirements and expectations to people up front to help them understand how their physical environment can affect their AR experience. You might also consider offering different sets of features for use in different environments.
Be mindful of people's comfort. Holding a device at a certain distance or angle for a prolonged period can be fatiguing. To help avoid causing fatigue, consider placing objects at a distance that reduces the need to move the device closer to the object; in a game, consider keeping levels short and intermixed with brief periods of downtime.
If your app encourages people to move, introduce motion gradually. For example, you might not want to make people dodge a virtual projectile as soon as they enter your AR game. Give people time to adapt to the AR experience in your app and then progressively encourage movement.
Be mindful of people's safety. When people are immersed in an AR experience, they're not necessarily aware of their physical surroundings, so making rapid, sweeping, or expansive motions might be dangerous. Consider ways of making your app safe to operate; for example, a game could avoid encouraging large or sudden movements.
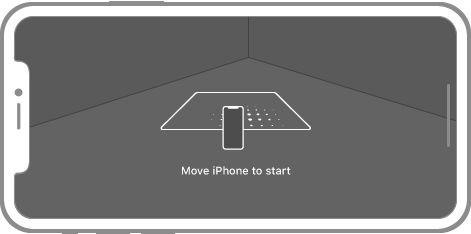
Using coaching to get people started
Before people can enjoy an AR experience in your app, they need to move their device in ways that lets ARKit evaluate the surroundings and detect surfaces. In iOS 13 and later, you can use the built-in coaching view to show people what to do and provide feedback during the initialization process. You can also use the coaching view to help people reinitialize AR — a process known as relocalization — after an AR experience is interrupted by, for example, people switching briefly to a different app. For guidance on relocalization, see Handling interruptions; for developer guidance, see ARCoachingOverlayView.
Hide unnecessary app UI while people are using a coaching view. By default, the coaching view appears automatically when initialization or relocalization starts, so you should be prepared to hide unrelated UI to help people focus on the coaching view’s instructions.
If necessary, offer a custom coaching experience. Although you can configure the system-provided coaching view to help people provide specific information — such as the detection of a horizontal or vertical plane — you might need additional information or want to use a different visual style. If you want to design a custom coaching experience, use the system-provided coaching view for reference.
Helping people place objects
Show people when to locate a surface and place an object. You can use the system-provided coaching view to help people find a horizontal or vertical flat surface on which to place an object. After ARKit detects a surface, your app can display a custom visual indicator to show when object placement is possible. You can help people understand how the placed object will look in the environment by aligning your indicator with the plane of the detected surface.

App-specific indicator
When people place an object, immediately integrate that object into the AR environment. Although surface detection quickly and progressively refines accuracy, it's best to avoid waiting for more accurate data before placing an object. Use the information available to respond instantly when people place an object; then, when surface detection completes, subtly refine the object's position if necessary. For example, if people place an object beyond the bounds of the detected surface, gently nudge the object back onto the surface. For developer guidance on refining an object's position, see ARTrackedRaycast.
Consider guiding people toward offscreen virtual objects. Sometimes, it can be difficult for people to locate an object that’s positioned offscreen. When this is the case, you can help people find such objects by offering visual or audible cues. For example, if an object is offscreen to the left, you could display an indicator along the left edge of the screen that guides people to point the camera in that direction.
Avoid trying to precisely align objects with the edges of detected surfaces. In AR, surface boundaries are approximations that may change as people's surroundings are further analyzed.
Incorporate plane classification information to inform object placement. For example, only let people place a virtual piece of furniture on a plane that's classified as “floor,” or require a plane to be classified as “table” in order to place a virtual game board.
Designing intuitive, delightful object interactions
Let people use direct manipulation to interact with objects when possible. It’s more immersive and intuitive when people can interact with onscreen 3D objects by touching them directly, than by using indirect controls in screen space. However, in situations where people are moving around as they use your app, indirect controls can work better.

Direct manipulation

Indirect controls
Let people directly interact with virtual objects using standard, familiar gestures. For example, consider supporting a single-finger drag gesture for moving objects, and a two-finger rotation gesture for spinning objects. For guidance, see Touchscreen gestures.
In general, keep interactions simple. Touch gestures are inherently two-dimensional, but an AR experience involves the three dimensions of the real world. Consider the following approaches to simplifying user interactions with virtual objects.

Limit movement to the two-dimensional surface on which the object rests.

Limit object rotation to a single axis.
Respond to gestures within reasonable proximity of interactive virtual objects. It can be difficult for people to be precise when aiming to touch specific points on objects that are small, thin, or placed at a distance. When your app detects a gesture near an interactive object, it's usually best to assume that people want to affect that object.
Support user-initiated object scaling when it makes sense in your app. For example, if your app lets people explore an imaginary environment, it probably makes sense to support object scaling because your app doesn’t need to represent the real world. On the other hand, if your app helps shoppers decide on furniture to buy, letting people scale a chair object doesn’t help them visualize how the chair will look in a room.
TIP Regardless of the purpose of your app, don’t use scaling as a way to adjust the distance of an object. If you enlarge a distant object in an effort to make it appear closer, the result is a larger object that still looks far away.
Be wary of potentially conflicting gestures. A two-finger pinch gesture, for example, is similar to a two-finger rotation gesture. If you implement two similar gestures like this, be sure to test your app and make sure they're interpreted properly.
Strive for virtual object movement that’s consistent with the physics of your app’s AR environment. People don’t necessarily expect an object to move smoothly over a rough or uneven surface, but they do expect objects to remain visible during movement. Aim to keep moving objects attached to real-world surfaces and avoid causing objects to jump or vanish and reappear as people resize, rotate, or move them.
Explore even more engaging methods of interaction. Gestures aren't the only way for people to interact with virtual objects in AR. Your app can use other factors, like motion and proximity, to bring content to life. A game character, for example, could turn its head to look at a person as they walk toward it.
Designing a great multiuser experience
When multiple people share your app's AR experience, each participant maps the environment independently and ARKit automatically merges the maps. For developer guidance, see isCollaborationEnabled.
Consider enabling people occlusion. If your app supports placing virtual objects behind people who appear in the device’s camera feed, enhance the illusion of reality by letting the people occlude the objects. For developer guidance, see Occluding virtual content with people.
When possible, let new participants enter a multiuser AR experience. Unless your app requires all participants to join before the experience begins, consider using implicit map merging to let new people quickly join an ongoing AR experience. For developer guidance, see isCollaborationEnabled.
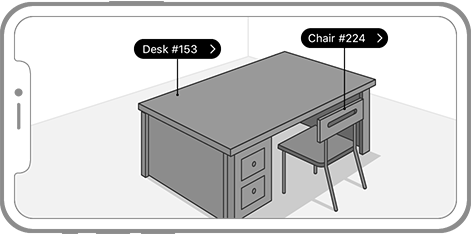
Reacting to real-world objects
You can enhance an AR experience by using known images and objects in the real-world environment to trigger the appearance of virtual content. For example, an app that recognizes theater posters for a sci-fi film could cause virtual space ships to emerge from the posters and fly around the environment. Another example is an app for an art museum that presents a virtual tour guide when it recognizes a sculpture. To enable experiences like these, your app provides a set of 2D reference images or 3D reference objects, and ARKit indicates when and where it detects any of these items in the current environment. For developer guidance, see Recognizing images in an AR experience.
When a detected image first disappears, consider delaying the removal of virtual objects that are attached to it. ARKit doesn’t track changes to the position or orientation of each detected image. To help prevent virtual objects from flickering, consider waiting up to one second before fading them out or removing them.
Limit the number of reference images in use at one time. Image detection performance works best when ARKit looks for 100 or fewer distinct images in the real-world environment. If you need more than 100 reference images, you can change the set of active reference images based on context. For example, a museum guide app could ask permission to use location services to determine the part of the museum a person is in, and then look only for images displayed in that area.
Limit the number of reference images requiring an accurate position. Updating the position of a reference image requires more resources. Use a tracked image when the image may move in the environment or when an attached animation or virtual object is small compared to the size of the image.
Communicating with people
If you must display instructional text, use approachable terminology. AR is an advanced concept that may be intimidating to some people. To help make it approachable, avoid using technical terms like ARKit, world detection, and tracking. Instead, use friendly, conversational terms that most people will understand.
| Do | Don't |
|---|---|
| Unable to find a surface. Try moving to the side or repositioning your phone. | Unable to find a plane. Adjust tracking. |
| Tap a location to place the [name of object to be placed]. | Tap a plane to anchor an object. |
| Try turning on more lights and moving around. | Insufficient features. |
| Try moving your phone more slowly. | Excessive motion detected. |
In a three-dimensional context, prefer 3D hints. For example, placing a 3D rotation indicator around an object is more intuitive than displaying text-based instructions in a 2D overlay. Avoid displaying textual overlay hints in a 3D context unless people aren’t responding to contextual hints.

Prefer a 3D hint in a 3D context.

If necessary, use a 2D hint in a 3D context.
Make important text readable. Use screen space to display text used for critical labels, annotations, and instructions. If you need to display text in 3D space, make sure the text faces people and that you use the same type size regardless of the distance between the text and the labeled object.
If necessary, provide a way to get more information. Design a visual indicator that fits with your app experience to show people that they can tap for more information.

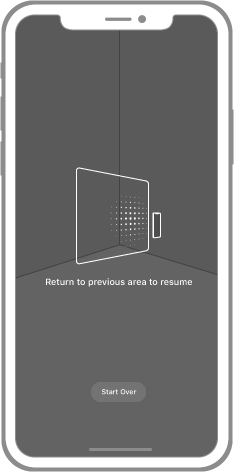
Handling interruptions
ARKit can't track device position and orientation during an interruption, such as when people briefly switch to another app or accept a phone call. After an interruption ends, previously placed virtual objects are likely to appear in the wrong real-world positions. When you enable relocalization, ARKit attempts to restore those virtual objects to their original real-world positions using new information. For developer guidance, see Managing session lifecycle and tracking quality.
Consider using the system-provided coaching view to help people relocalize. During relocalization, ARKit attempts to reconcile its previous state with new observations of the current environment. To enable these observations, you can use the coaching view to help people return the device to its previous position and orientation.
Consider hiding previously placed virtual objects during relocalization. To avoid flickering or other unpleasant visual effects during relocalization, it can be best to hide virtual objects and redisplay them in their new positions.
Minimize interruptions if your app supports both AR and non-AR experiences. One way to avoid interruptions is by embedding a non-AR experience within an AR experience so that people can handle the task without exiting and re-entering AR. For example, if your app helps people decide on a piece of furniture to purchase by placing the item in a room, you might let them change the upholstery without leaving the AR experience.
Allow people to cancel relocalization. If people don’t position and orient their device near where it was before an interruption, relocalization continues indefinitely without success. If coaching people to resume their session isn’t successful, consider providing a reset button or other way to restart the AR experience.
Indicate when the front-facing camera is unable to track a face for more than about half a second. Use a visual indicator to indicate that the camera can no longer track the person’s face. If you need to provide text instructions in this situation, keep them to a minimum.
Suggesting ways to resolve problems
Let people reset the experience if it doesn’t meet their expectations. Don't force people to wait for conditions to improve or struggle with object placement. Give them a way to start over again and see if they have better results.

Sufficient lighting

Insufficient lighting
Suggest possible fixes if problems occur. Analysis of the real-world environment and surface detection can fail or take too long for a variety of reasons — insufficient light, an overly reflective surface, a surface without enough detail, or too much camera motion. If your app is notified of these problems, use straightforward, friendly language to offer suggestions for resolving them.
| Problem | Possible suggestion |
|---|---|
| Insufficient features detected. | Try turning on more lights and moving around. |
| Excessive motion detected. | Try moving your phone slower. |
| Surface detection takes too long. | Try moving around, turning on more lights, and making sure your phone is pointed at a sufficiently textured surface. |
AR icon
Apps can display an AR icon in controls that launch ARKit-based experiences. You can download this icon in Resources.


Use the AR glyph as intended. The glyph should be used strictly for initiating an ARKit-based experience. Never alter the glyph (other than adjusting its size and color), use it for other purposes, or use it in conjunction with AR experiences not created using ARKit.
Maintain minimum clear space. The minimum amount of clear space required around an AR glyph is 10% of the glyph's height. Don’t let other elements infringe on this space or occlude the glyph in any way.

AR badges
Apps that include collections of products or other objects can use badging to identify specific items that can be viewed in AR using ARKit. For example, a department store app might use a badge to mark furniture that people can preview in their home before making a purchase.

Use the AR badges as intended and don’t alter them. You can download AR badges, available in collapsed and expanded form, in Resources. Use these images exclusively to identify products or other objects that can be viewed in AR using ARKit. Never alter the badges, change their color, use them for other purposes, or use them in conjunction with AR experiences not created with ARKit.
![]()
AR badge
![]()
Glyph-only AR badge
Prefer the AR badge to the glyph-only badge. In general, use the glyph-only badge for constrained spaces that can't accommodate the AR badge. Both badges work well at their default size.
Use badging only when your app contains a mixture of objects that can be viewed in AR and objects that cannot. If all objects in your app can be viewed in AR, then badging is redundant.
Keep badge placement consistent and clear. A badge looks best when displayed in one corner of an object's photo. Always place it in the same corner and make sure it's large enough to be seen clearly (but not so large that it occludes important detail in the photo).
Maintain minimum clear space. The minimum amount of clear space required around an AR badge is 10% of the badge's height. Other elements shouldn't infringe on this space and occlude the badge in any way.
![]()
![]()


