-
Optimize the Core Image pipeline for your video app
Explore how you can harness the processing power of Core Image and optimize video performance within your app. We'll show you how to build your Core Image pipeline for applying effects to your video in your apps: Discover how to reduce your app's memory footprint when using CIContext, and learn best practices for using AVPlayView or MTKView view classes for video playback with Core Image filters. Additionally, find out why you should write your own custom kernels in the Metal Shading Language, and learn performance tips for optimal usage of Metal command queues in your Core Image pipeline.
Resources
Related Videos
WWDC22
WWDC21
WWDC20
-
Search this video…
Hello and welcome to WWDC.
Welcome, everyone. My name is David Hayward, and I'll be giving a short presentation today that will show how to get the best performance when using Core Image to apply effects to your video app. With that goal in mind, I will discuss the following topics: How best to create a CIContext, how to write and apply custom CI Kernels, and how to optimally render to your view.
So, let's dive in and start with Creating a CIContext.
The first advice when creating your CIContext is to only create one per view.
Contexts are easy to create, but they take time and memory to initialize, so you don't wanna do it often. Also, when you create your context, there are some options that should be specified. Most important is to tell the context not to cache intermediates. With video, every frame is different than the one before it, so disabling this cache will lower memory usage.
Also, I recommend that you give your context a name.
This can be useful when using Core Image debugging techniques.
Under the hood, Core Image uses Metal, but some applications may want to combine Core Image with other Metal APIs.
For example, you may want to use a Metal texture as input or output for Core Image.
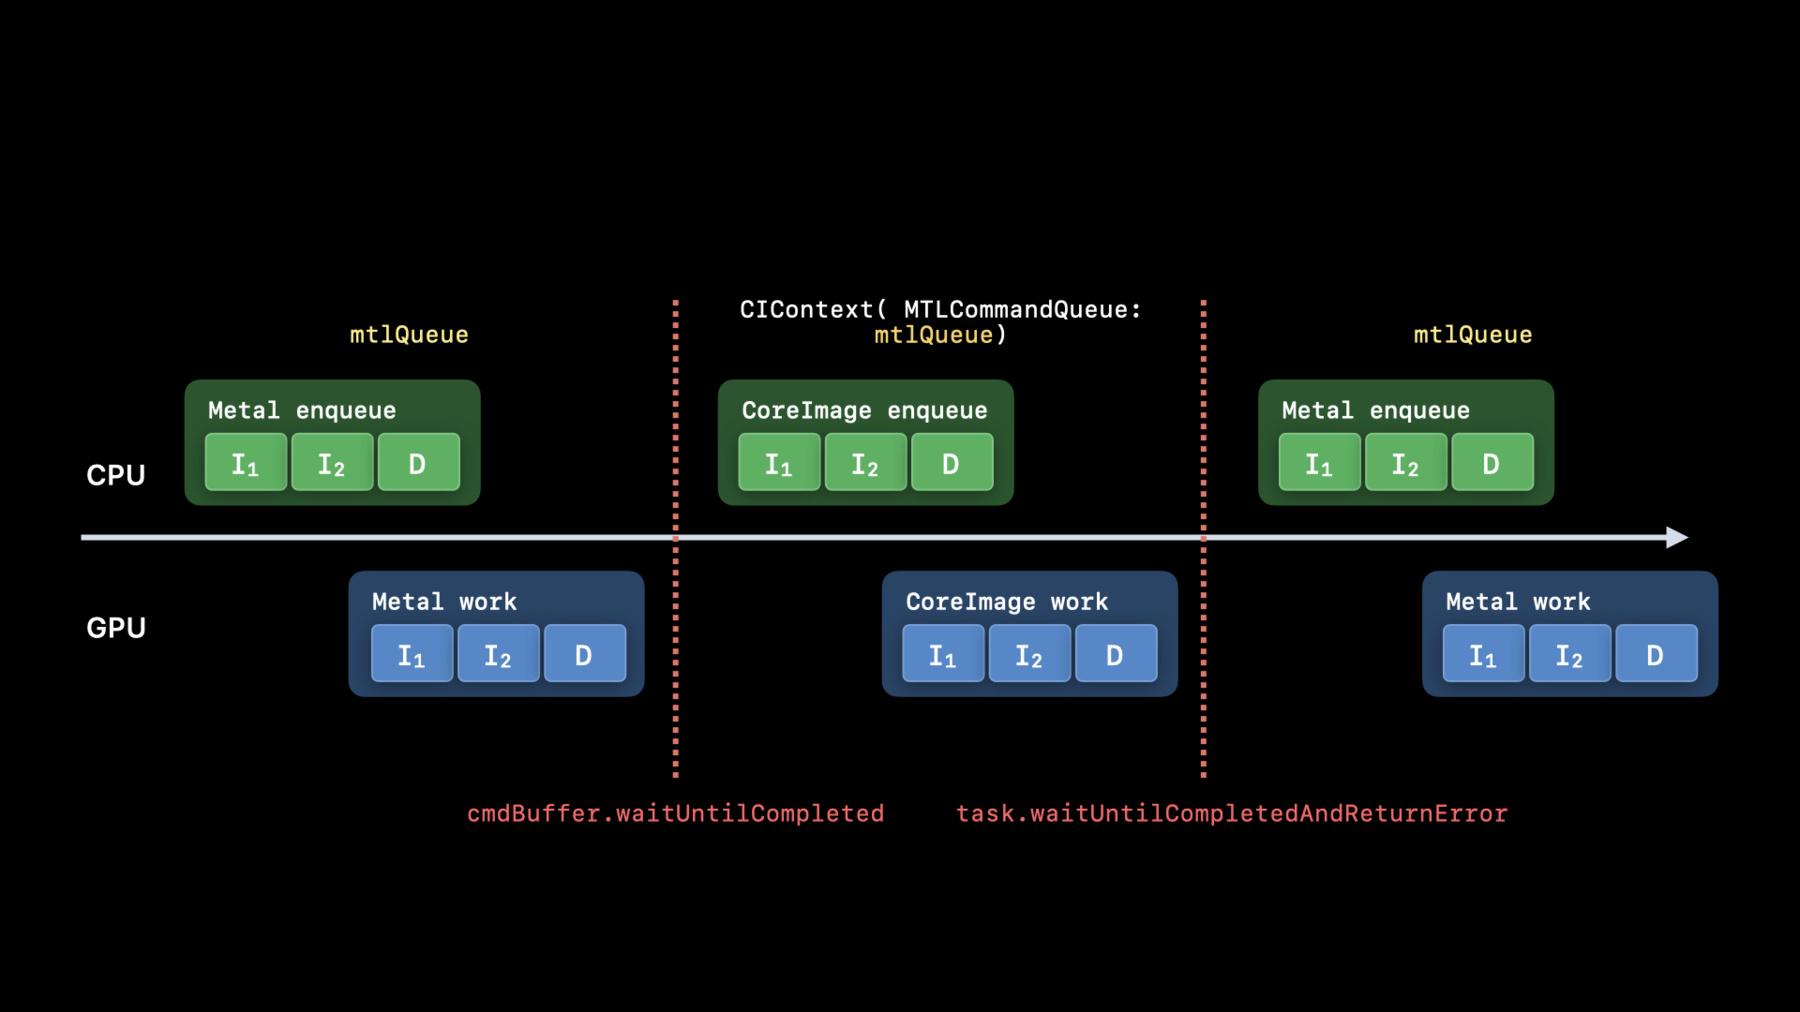
In these situations, I recommend that you create your CIContext with a Metal-Command-Queue. A timeline graph is the best way to explain why. Consider a situation where an app first uses its Metal-Command-Queue to render content into a Metal texture.
This involves enqueueing work on the CPU which is performed on the GPU. Next, the app passes that texture to Core Image which uses its own internal Metal queue to render content into another Metal texture. This also involves enqueueing work on the CPU which is performed on the GPU.
Lastly, the app uses its Metal queue again to render with the output texture from Core Image.
Because all this work is done on different queues, the app must issue wait commands to get the correct results.
This causes wasteful bubbles due to inefficient pipelining. The solution to this problem is to create the CIContext with the same queue that is used by the other Metal renders. This allows the app to remove the waits.
And by doing so, the work can be pipelined efficiently for the best performance.
The next topic to discuss is writing CIKernels in Metal. To get the best performance in your video app, it is important that the effects are implemented in Metal. The easiest way to do this is to use built-in Core Image filters wherever possible because they are all implemented in Metal.
To help you use the built-in filters we have been upgrading the documentation to include parameter descriptions, sample images, and even sample code is included.
The code to apply a built-in filter is really simple. Just import CI-Filters-Built-ins, create a filter instance, set the input properties, and get the output image. Here are some more reasons why you want to write custom CIKernels in Metal: In addition to the usual features of CIKernels, such as automatic tiling and concatenation, by writing them in Metal, you will reduce runtime compile time by shifting that work to when your app is built. Also, you'll give your kernels access to high performance features such as gather-reads, group-writes, and half-float math, and make your life easier as a developer by syntax highlighting as you type and syntax checking when you build. Let's go over an example of writing CIKernels in Metal. For today's session, I will demonstrate this with a kernel that is shown in the presentation, Edit and Playback HDR Video with AVFoundation. It is very easy to write a custom CIKernel for this effect. First, at the top of the source you will include the Core-Image-dot-h header so that you get access to all the normal Metal classes as well as the additional classes that Core Image provides. Next, you will declare the function for the kernel which must be extern "C." This example is a CI-Color-Kernel, so the function must return a float4 pixel and take some arguments.
Here, the first argument is a Core Image sample_t that represents a pixel from an input image. This pixel is a linear premultiplied RGBA float4, which is suitable for either SDR or HDR images.
The last argument is a Core Image destination that provides the coordinate of the pixel to return. In the implementation of this kernel, we use the dest-coord x and y values to determine which diagonal line we are on. Then we use some simple math to calculate if we should be on a zebra stripe or not.
If we are on a zebra stripe and the current pixel sample is brighter than the normal Standard Dynamic Range white of one, then we will return a bright red pixel. Otherwise, we return the input sample unchanged.
For more details, see my presentation on "Build Metal-Based Core Image Kernels with Xcode." The last topic to discuss is choosing the best view class for your video app. If your app applies effects to video, it is important to avoid view classes like UI-Image-View and NS-Image-View that are designed for displaying static content. The easiest view class is AV-Player-View because it automatically does the work to display filtered video to the view. A more flexible option that can also give great performance is MetalKit View. I will discuss how to use both with Core Image in the next few slides.
Using AV-Player-View is really simple.
The key object is an AV-Mutable-Video-Composition, which is initialized with a video asset and a handler block. This block is called for every frame in the video, and it is passed an AV-Synchronous- CI-Image-Filtering-Request. When your block is called, all you need to do is create a CI-Filter, set its inputs and get its output image. Then you just need give that image to the request object.
A great feature in Xcode is that while debugging, you can hover over a CI-Image variable and a small popover will appear that shows the object's address, but if you then click on the eye symbol, a new window will appear that shows a visual representation of the recipe that makes up the image. And if you look at this even closer, you can see that the input video frame is a 10-bit HDR surface, and Core Image has automatically color managed it from HLG to the Core Image working space. Using a MetalKit View to display your filtered videos is another option you might consider.
Here's how to get the best performance with Core Image when drawing to a MetalKit View. The first thing you'll want to do in your MetalKit View class is override the init with frame and device. The init method is the best time to create a CIContext for the view. Be sure to set framebuffer-Only to false so that Core Image can use Metal Compute.
On macOS, if your view supports HDR, then you should set the color-Pixel-Format to rgba16Float and also set the wants-Extended- Dynamic-Range-Content to true. The next thing you'll want to do in your MetalKit View is implement the draw-in view method. In this method we create a CI-Render-Destination in a special way. We create the destination with the correct width, height and pixel format, but instead of passing in a Metal texture, we pass in a block that will return the texture. This allows the CIContext to start enqueueing Metal work before waiting on the previous frame to complete. Next we tell our CIContext to start the task of rendering the image to the destination.
And last step is to create a command buffer to present the current drawable to the view.
So, that concludes my step-by-step discussion on how to get great performance with Core Image in your video app. We have reviewed how best to create CIContexts, apply CIKernels and render to your view.
I hope that this allows you to add great visual effects to your apps' videos. Thank you very much, and enjoy the rest of WWDC 2020.
-
-
0:52 - Creating CIContext
let context = CIContext(options: [ .cacheIntermediates : false, .name : ”MyAppView” ]) -
1:26 - Creating CIContext 2
let context = CIContext(MTLCommandQueue : queue, options: […]) -
2:59 - Use builtins Whenever possible
import CoreImage.CIFilterBuiltins func motionBlur(inputImage: CIImage) -> CIImage? { let motionBlurFilter = CIFilter.motionBlur() motionBlurFilter.inputImage = inputImage motionBlurFilter.angle = 0 motionBlurFilter.radius = 20 return motionBlurFilter.outputImage } -
3:56 - Put your kernels in .ci.metal sources
// MyKernels.ci.metal #include <CoreImage/CoreImage.h> // includes CIKernelMetalLib.h using namespace metal; extern "C" float4 HDRZebra (coreimage::sample_t s, float time, coreimage::destination dest) { float diagLine = dest.coord().x + dest.coord().y; float zebra = fract(diagLine/20.0 + time*2.0); if ((zebra > 0.5) && (s.r > 1 || s.g > 1 || s.b > 1)) return float4(2.0, 0.0, 0.0, 1.0); return s; } -
5:50 - Using AVPlayer View
let videoComposition = AVMutableVideoComposition( asset: asset, applyingCIFiltersWithHandler: { (request: AVAsynchronousCIImageFilteringRequest) -> Void in let filter = HDRZebraFilter() filter.inputImage = request.sourceImage let output = filter.outputImage if (output != nil) { request.finish(with: output, context: myCtx) } else { request.finish(with: err) } } ) -
7:01 - Using MTKView
class MyView : MTKView { var context: CIContext var commandQueue : MTLCommandQueue override init(frame frameRect: CGRect, device: MTLDevice?) { let dev = device ?? MTLCreateSystemDefaultDevice()! context = CIContext(mtlDevice: dev, options: [.cacheIntermediates : false] ) commandQueue = dev.makeCommandQueue()! super.init(frame: frameRect, device: dev) framebufferOnly = false // allow Core Image to use Metal Compute colorPixelFormat = MTLPixelFormat.rgba16Float if let caml = layer as? CAMetalLayer { caml.wantsExtendedDynamicRangeContent = true } } -
7:29 - Using MTKView 2
func draw(in view: MTKView) {

        let size = self.convertToBacking(self.bounds.size)
        let rd = CIRenderDestination(width: Int(size.width),
                                     height: Int(size.height),
                                     pixelFormat: colorPixelFormat,
                                     commandBuffer: nil)
                  { () -> MTLTexture in return view.currentDrawable!.texture }

        context.startTask(toRender:image, from:rect, to:rd, at:point)

        // Present the current drawable
        let cmdBuf = commandQueue.makeCommandBuffer()!
        cmdBuf.present(view.currentDrawable!)
        cmdBuf.commit()
   }
-