Accessing private data
To help people trust your app or game, you must be transparent about the privacy-related data and resources you require and how you use them.
People use their devices in very personal ways and they expect apps to help them preserve their privacy. In addition to requesting permission to track people or access their data and device resources (including the advertising identifier), it’s essential to protect the data you’re allowed to access.
When you submit a new or updated app, you must provide details about your privacy practices and the privacy-relevant data you collect so the App Store can display the information on your product page. (You can manage this information at any time in App Store Connect.) People use the privacy details on your product page to make an informed decision before they download your app. To learn more, see App privacy details on the App Store.
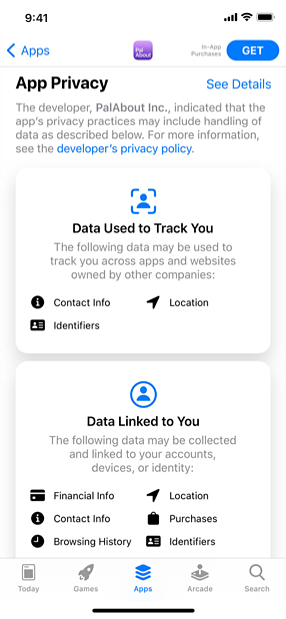
An app’s App Store product page helps people understand the app’s privacy practices before they download it.
Requesting permission
Here are several examples of the things you must request permission to access:
- Personal data, including location, health, financial, contact, and other personally identifying information
- User-generated content like emails, messages, calendar data, contacts, gameplay information, Apple Music activity, HomeKit data, and audio, video, and photo content
- Protected resources like Bluetooth peripherals, home automation features, Wi-Fi connections, and local networks
- Device capabilities like camera and microphone
- The device’s advertising identifier, which enables app tracking
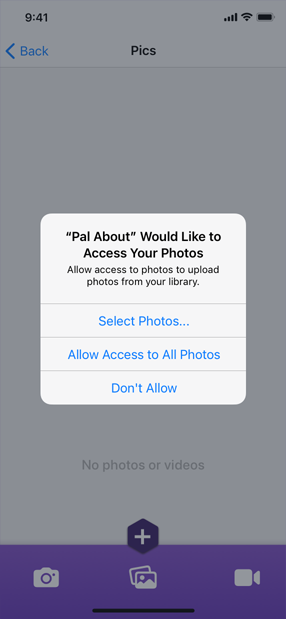
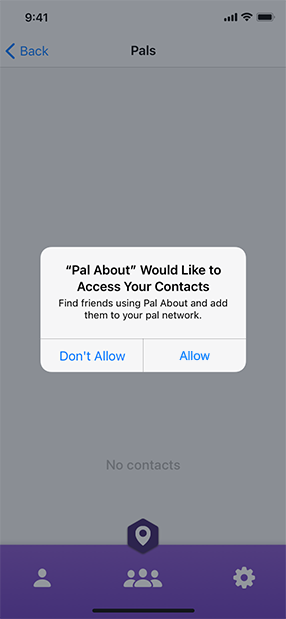
The system provides a standard alert that lets people view each request you make. You supply copy that describes why your app needs access, and the system displays your description in the alert. People can also view the description — and update their choice — in Settings > Privacy.
Request permission only when your app clearly needs access to the data or resource. It’s natural for people to be suspicious of a request for personal information or access to a device capability, especially if there’s no obvious need for it. Ideally, wait to request permission until people actually use an app feature that requires access. For example, you can use the location button to give people a way to share their location after they indicate interest in a feature that needs that information.
Avoid requesting permission at launch unless the data or resource is required for your app to function. People are less likely to be bothered by a launch-time request when it’s obvious why you’re making it. For example, people understand that a navigation app needs access to their location before they can benefit from it.
Write copy that clearly describes how your app uses the ability, data, or resource you’re requesting. The standard alert displays your copy (called a purpose string or usage description string) after your app name and before the buttons people use to grant or deny their permission. Aim for a brief, complete sentence that’s straightforward, specific, and easy to understand. Use sentence case, avoid passive voice, and include a period at the end. For developer guidance, see Requesting Access to Protected Resources and App Tracking Transparency.
| Example purpose string | Notes | |
|---|---|---|
| The app records during the night to detect snoring sounds. | An active sentence that clearly describes how and why the app collects the data. | |
| Microphone access is needed for a better experience. | A passive sentence that provides a vague, undefined justification. | |
| Turn on microphone access. | An imperative sentence that doesn’t provide any justification. |
Here are several examples of the standard system alert:

Location button
Beginning in iOS 15, iPadOS 15, and watchOS 8, Core Location provides a button so people can grant your app temporary authorization to access their location at the moment a task needs it. A location button’s appearance can vary to match your app’s UI and it always communicates the action of location sharing in a way that’s instantly recognizable.
![]()
The first time people open your app and tap a location button, the system displays a standard alert. The alert helps people understand how using the button limits your app’s access to their location, and reminds them of the location indicator that appears when sharing starts.

After people confirm their understanding of the button’s action, simply tapping the location button gives your app one-time permission to access their location. Although each one-time authorization expires when people stop using your app, they don’t need to reconfirm their understanding of the button’s behavior.
NOTE If your app has no authorization status, tapping the location button has the same effect as when a person chooses Allow Once in the standard alert. If people previously chose While Using the App, tapping the location button doesn’t change your app’s status. For developer guidance, see LocationButton (SwiftUI) and CLLocationButton (Swift).
Consider using the location button to give people a lightweight way to share their location for specific app features. For example, your app might help people attach their location to a message or post, find a store, or identify a building, plant, or animal they’ve encountered in their location. If you know that people often grant your app *Allow Once *permission, consider using the location button to help them benefit from sharing their location without having to repeatedly interact with the alert.
Consider customizing the location button to harmonize with your UI. Specifically, you can:
- Choose the system-provided title that works best with your feature, such as “Current Location” or “Share My Current Location”
- Choose the filled or outlined location glyph
- Select a background color and a color for the title and glyph
- Adjust the button’s corner radius
To help people recognize and trust location buttons, you can’t customize the button’s other visual attributes. The system also ensures a location button remains legible by warning you about problems like low-contrast color combinations or too much translucency. In addition to fixing such problems, you're responsible for making sure the text fits in the button — for example, button text needs to fit without truncation at all accessibility text sizes and when translated into other languages.
IMPORTANT If the system identifies consistent problems with your customized location button, it won’t give your app access to the device location when people tap it. Although such a button can perform other app-specific actions, people may lose trust in your app if your location button doesn’t work as they expect.
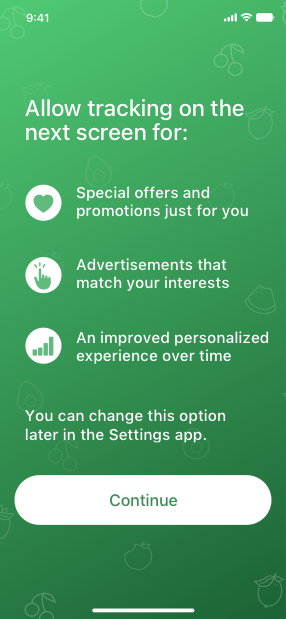
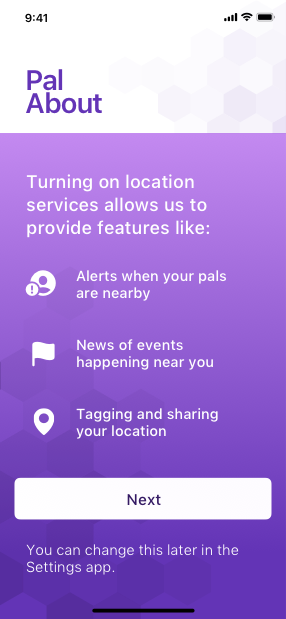
Pre-alert screens
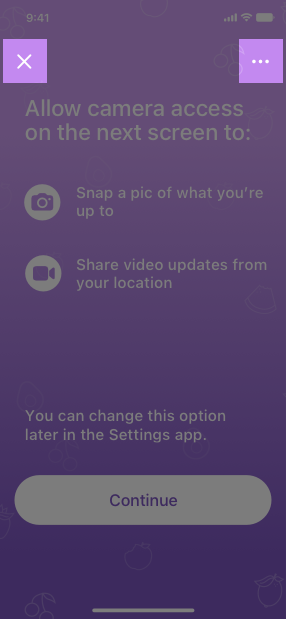
Ideally, the current context helps people understand why you’re requesting their permission. If it’s essential to provide additional details, you can display a custom screen before the system alert appears. The following guidelines apply to custom screens that display before system alerts that request permission to access protected data and resources, including camera, microphone, location, contact, calendar, and tracking.
Include only one button and make it clear that it opens the system alert. People can feel manipulated when a custom screen also includes a button that doesn’t open the alert because the experience diverts them from making their choice. Another type of manipulation is using a term like “Allow” to title the custom screen’s button. If the screen’s button seems similar in meaning and visual weight to the allow button in the alert, people can be more likely to choose the alert’s allow button without meaning to. Use a term like “Continue” or “Next” to title your custom screen’s single button, clarifying that its action is to open the system alert.
![]()
![]()
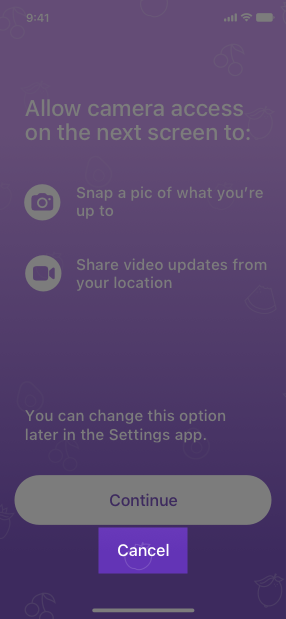
Don’t include additional actions in your custom screen. For example, don’t provide a way for people to leave the screen without viewing the system alert — like offering an option to close or cancel.
![]()
![]()
Tracking requests
App tracking is a sensitive issue. In some cases, it might make sense to display a custom screen that describes the benefits of tracking. If you want to perform app tracking as soon as people launch your app, you must display the system-provided alert before you collect any tracking data.
Never precede the system-provided alert with a custom screen that could confuse or mislead people. People sometimes tap quickly to dismiss alerts without reading them. A custom messaging screen that takes advantage of such behaviors to influence choices will lead to rejection by App Store review.
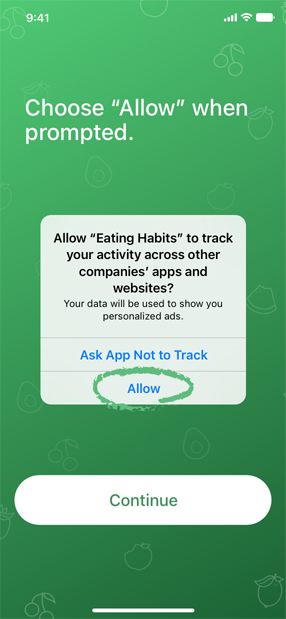
There are several prohibited custom-screen designs that will cause rejection. Some examples are offering incentives, displaying a screen that looks like a request, displaying an image of the alert, and annotating the screen behind the alert (as shown below). For guidance, see App Store Review Guidelines: 5.1.1 (iv).
-
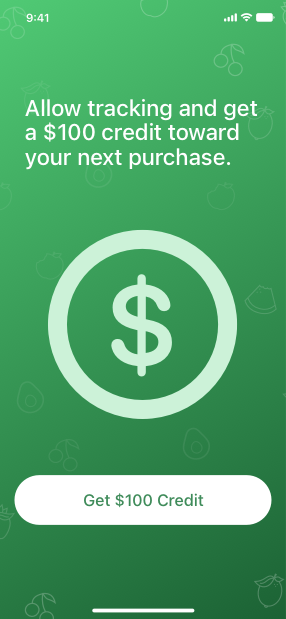

Don’t offer incentives for granting the request. You can’t offer people compensation for granting their permission, and you can’t withhold functionality or content or make your app unusable until people allow you to track them.
-
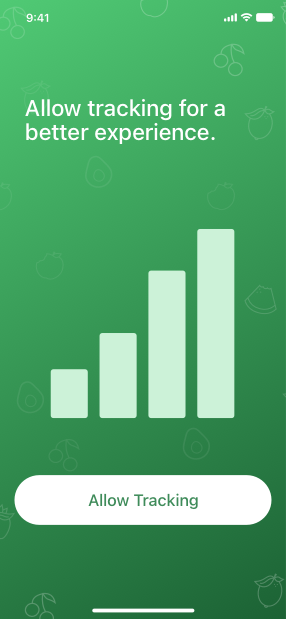
Don’t display a custom screen that mirrors the functionality of the system alert. In particular, don’t create a button title that uses "Allow" or similar terms, because people don’t allow anything in a pre-alert screen.
-
Don’t show an image of the standard alert and modify it in any way.
-
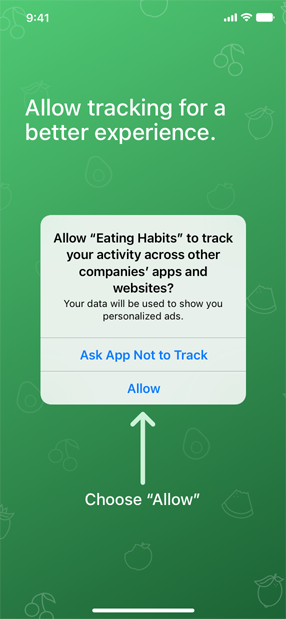
Don’t draw a visual cue that draws people’s attention to the system alert’s Allow button.
Protecting data
Protecting people’s information is paramount. Give people confidence in your app’s security and help preserve their privacy by taking advantage of system-provided security technologies when you need to store information locally, authorize people for specific operations, and transport information across a network.
Here are some high-level guidelines.
Avoid relying solely on passwords for authentication. Take advantage of other technologies like Touch ID, which lets people authenticate with a fingerprint. For developer guidance, see Local Authentication.
Store sensitive information in a keychain. A keychain provides a secure, predictable user experience when handling someone’s private information. For developer guidance, see Keychain Services.
Never store passwords or other secure content in plain-text files. Even if you restrict access using file permissions, sensitive information is much safer in an encrypted keychain.
Avoid inventing custom authentication schemes. If your app requires authentication, prefer system-provided features like Sign in with Apple or Password AutoFill. For guidance, see Managing accounts.
Platform considerations
No additional considerations for iOS, iPadOS, tvOS, or watchOS.
macOS
Sign your app with a valid Developer ID. If you choose to distribute your app outside the store, signing your app with Developer ID identifies you as an Apple developer and confirms that your app is safe to use. For developer guidance, see Xcode Help.
Protect people’s data with app sandboxing. Sandboxing provides your app with access to system resources and user data while protecting it from malware. All apps submitted to the Mac App Store require sandboxing. For developer guidance, see Configuring the macOS App Sandbox.
Avoid making assumptions about who is signed in. Because of fast user switching, multiple people may be active on the same system.


