Take a moment to familiarize yourself with the tools and technologies you’ll use to develop apps and games for Apple Vision Pro and visionOS. Apple provides everything you need to get started, and visionOS helps you get the features and performance you want from your apps.
Explore the possibilities
Apple Vision Pro is the first platform designed from the ground up for spatial computing. People use Apple Vision Pro to interact with apps and games on an infinite canvas that blends with their surroundings, or to immerse themselves in a single experience that takes them to new places. Learn how to build apps that take advantage of the unique capabilities of visionOS to reimagine what it means to be connected, productive, and entertained. And learn how to use existing frameworks like SwiftUI, UIKit, RealityKit, and ARKit to bring your app to visionOS:
Create familiar windows in the Shared Space. Open one or more windows, which are SwiftUI scenes and appear as planes in space. They use traditional views and controls, and you can open one or more of them to manage your app’s content. Your app’s windows appear alongside other apps, and people can resize windows and position them in their surroundings.
Extend your interface with 3D elements. Add 3D objects or a RealityView to your windows to give them added depth. If you want people to have the ability to view content from all angles, consider creating a volume, which appears in the Shared Space alongside your app’s other windows.
Increase the level of immersion. When your app opens a Full Space it takes over the whole visionOS canvas. You can place 3D content directly in the person’s surroundings, open a portal to another world, or replace the person’s surroundings altogether. When a Full Space is open, the system shows your app’s windows and volumes, and hides content from other apps.
When you build apps for visionOS, you can mix and match windows, volumes, and spaces at any time in your app to create the right moments for your content. Find key moments in your app where you might want to increase immersion, and provide natural transitions from one level of immersion to another.
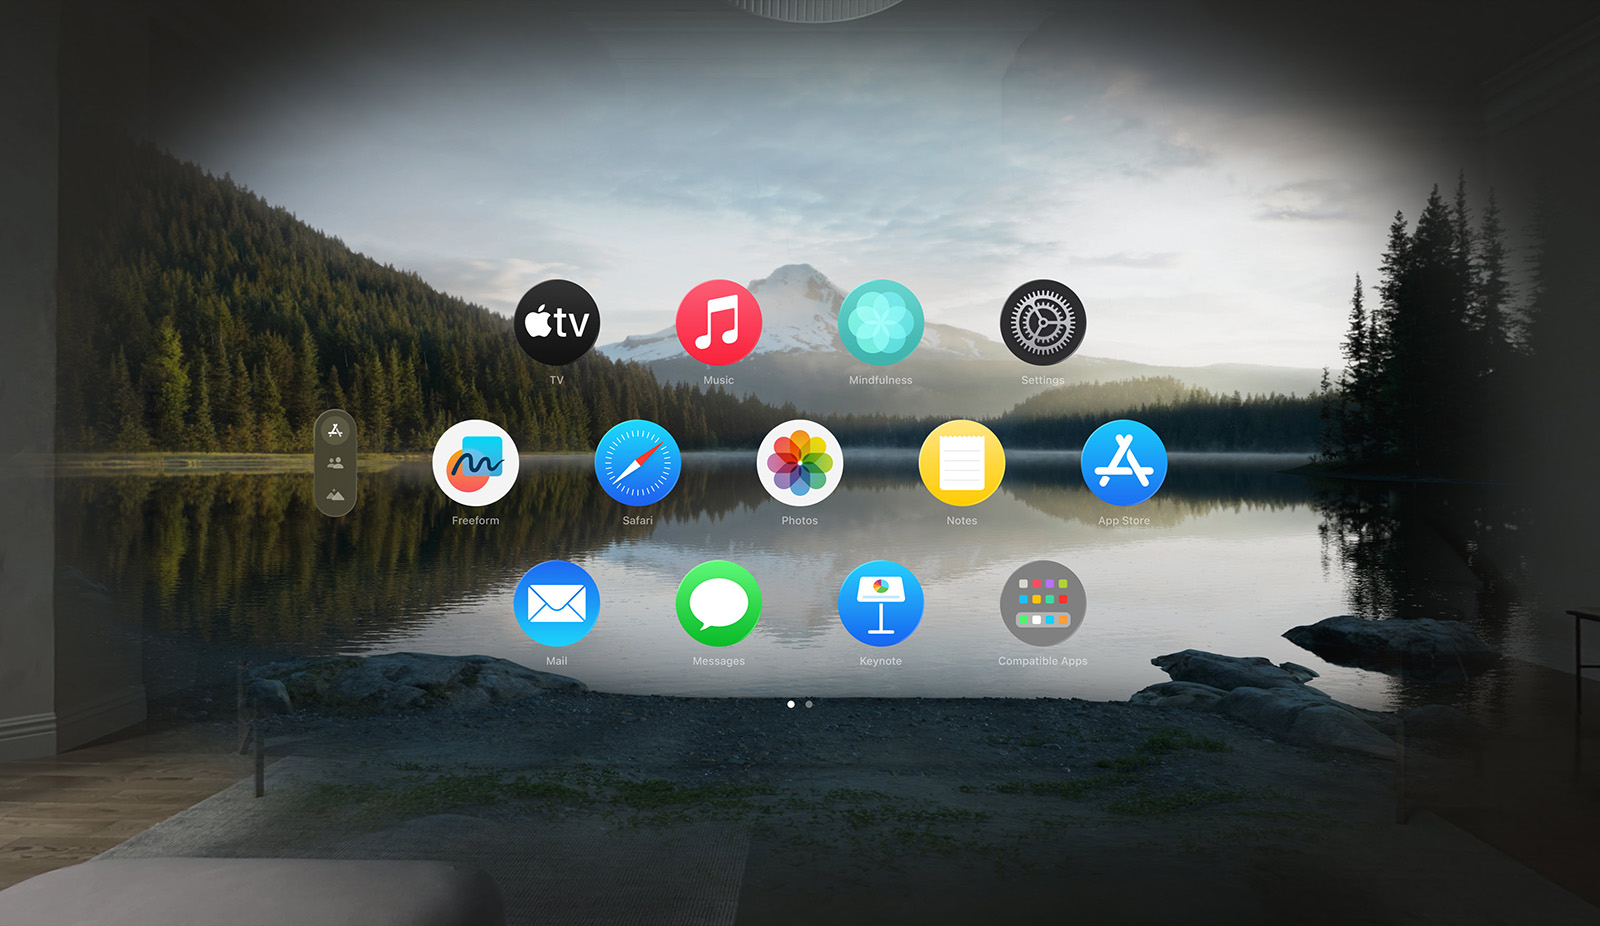
People can also run your existing iPadOS or iOS app as a compatible app in visionOS. Your app appears as a single, scalable window in the person’s surroundings.
Where to start
Start the software development process with Xcode — Apple’s integrated development environment. Xcode offers a complete set of tools to develop software, including project management support, code editors, visual editors for your UI, debugging tools, simulators for different devices, tools for assessing performance, and much more. Xcode also includes a complete set of system code modules — called frameworks — for developing your software.
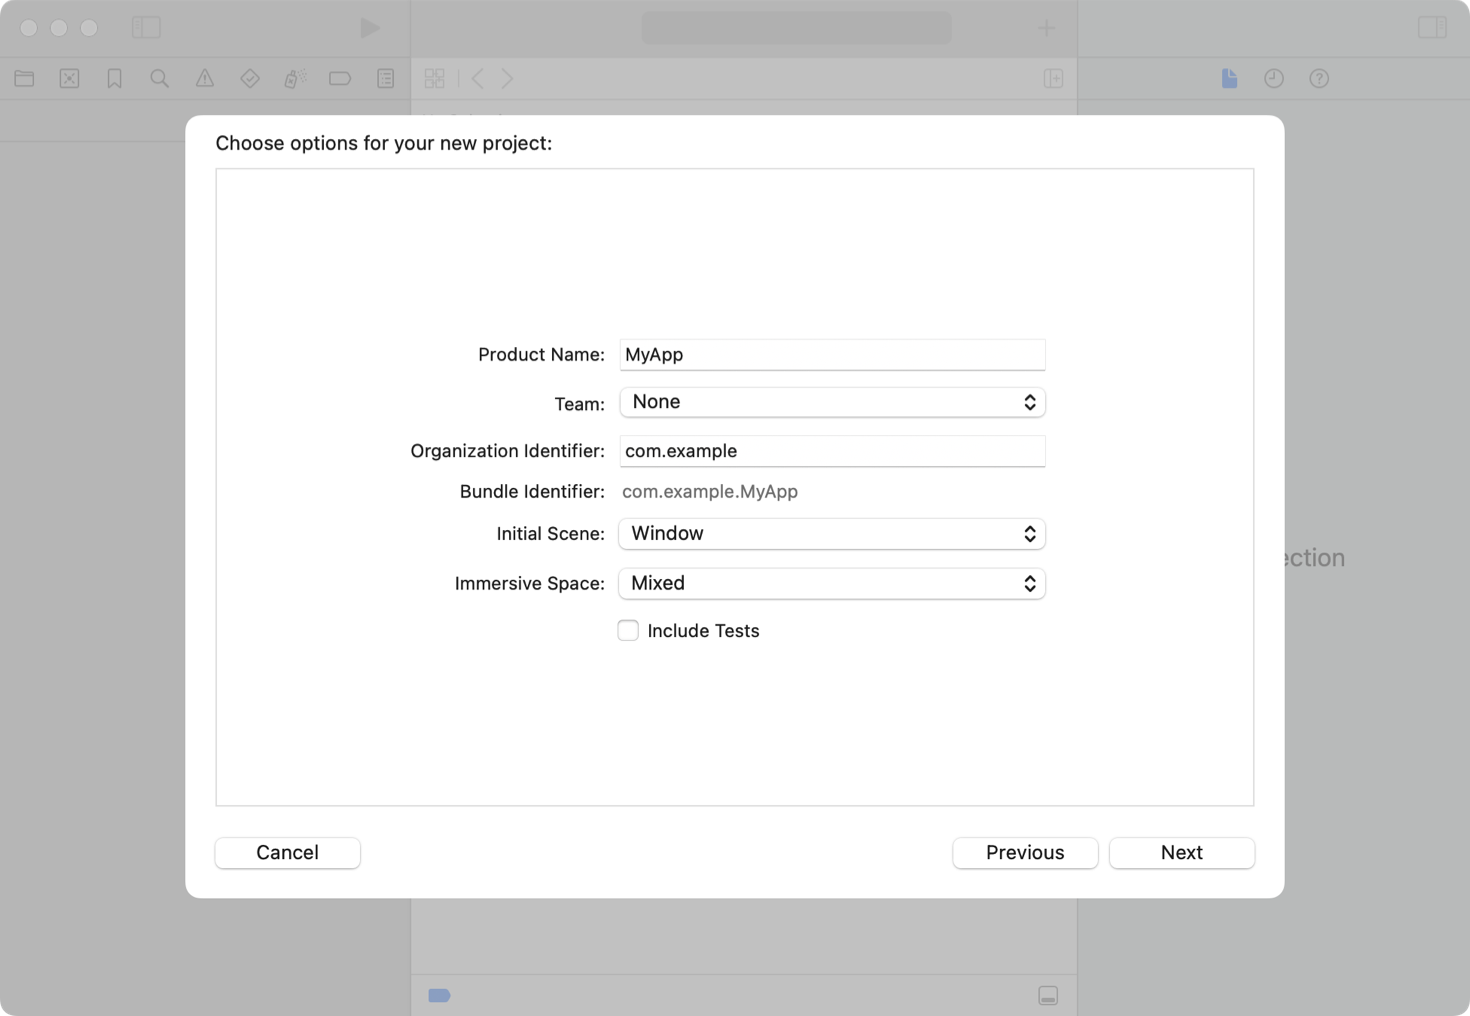
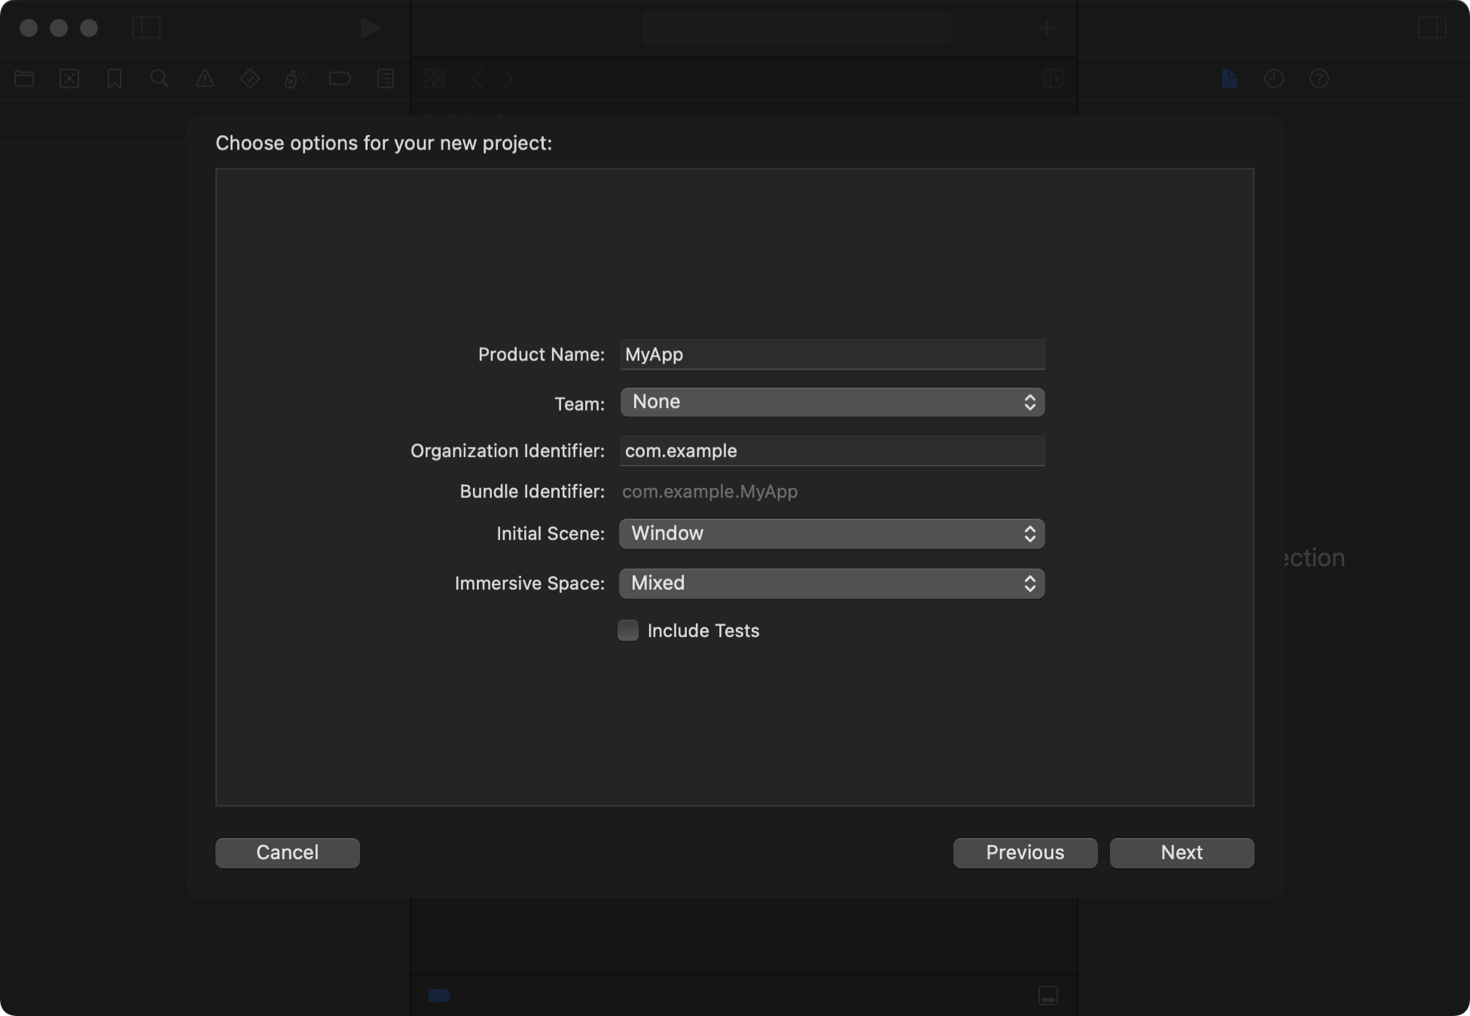
To create a new project in Xcode, choose File > New > Project and follow the prompts to create a visionOS app. All new projects use SwiftUI, which offers a modern declarative programming model to create your app’s core functionality.
SwiftUI works seamlessly with Apple’s data management technologies to support the creation of your content. The Swift standard library and Foundation framework provide structural types such as arrays and dictionaries, and value types for strings, numbers, dates, and other common data values. For any custom types you define, adopt Swift’s Codable support to persist those types to disk. If your app manages larger amounts of structured data, SwiftData, Core Data, and CloudKit offer object-oriented models to manage and persist your data.
You can also use Unity’s robust, familiar authoring tools to create new apps and games. Get access to all the benefits of visionOS, like passthrough and Dynamically Foveated Rendering, in addition to familiar Unity features like AR Foundation.
Add a new dimension to your interface
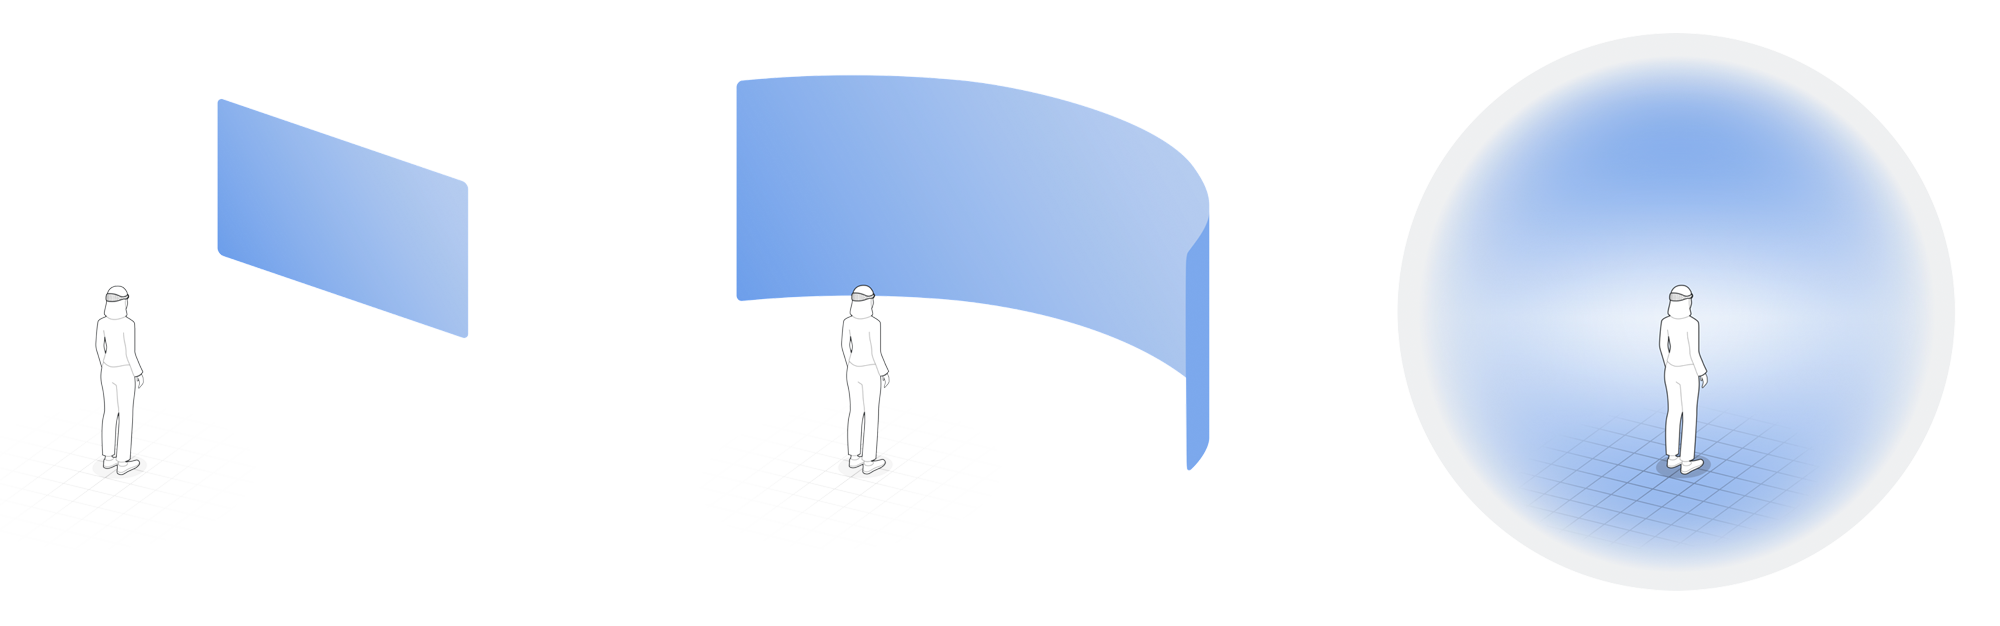
When building your app, start with a window and add elements as appropriate to help immerse people in your content. Add a volume to showcase 3D content, or increase the level of immersion using a Full Space. The mixed style configures the space to display passthrough, but you can apply the progressive or full style to increase immersion and minimize distractions.
Add depth to your windows. Apply depth-based offsets to views to emphasize parts of your window, or to indicate a change in modality. Incorporate 3D objects directly into your view layouts to place them side by side with your 2D views.
Add hover effects to custom views. Highlight custom elements when someone looks at them using hover effects. Customize the behavior of your hover effects to achieve the look you want.
Implement menus and toolbars using ornaments. Place frequently used tools and commands on the outside edge of your windows using ornaments.
RealityKit plays an important role in visionOS apps, and you use it to manage the creation and animation of 3D objects in your apps. Create RealityKit content programmatically, or use Reality Composer Pro to build entire scenes that contain all the objects, animations, sounds, and visual effects you need. Include those scenes in your windows, volumes, or spaces using a RealityView. In addition, take advantage of other 3D features in your apps:
Adopt MaterialX shaders for dynamic effects.MaterialX is an open standard supported by leading film, visual effects, entertainment, and gaming companies. Use existing tools to create MaterialX shaders, and integrate them into your RealityKit scenes using Reality Composer Pro.
Store 3D content in USDZ files. Build complex 3D objects and meshes using your favorite tools and store them as USDZ assets in your project. Make nondestructive changes to your assets in Reality Composer Pro and combine them into larger scenes.
Create previews of your 3D content in Xcode. Preview SwiftUI views with 3D content directly from your project window. Specify multiple camera positions for your Xcode previews to see your content from different angles.
Human Interface Guidelines
Apple’s Human Interface Guidelines offer invaluable information on how to design your app’s interface, navigate content, and manage interactions. Make reading these guidelines a priority in your explorations of the visionOS ecosystem.
Devise straightforward interactions
In visionOS, people interact with apps primarily using their eyes and hands. In an indirect gesture, someone looks at an object, and then selects it by tapping a finger to their thumb. In a direct gesture, the person’s finger interacts with the object in 3D space. When handling input in your app:
Adopt the standard system gestures. Rely on tap, swipe, drag, touch and hold, double-tap, zoom, and rotate gestures for the majority of interactions with your app. SwiftUI and UIKit provide built-in support for handling these gestures across platforms.
Add support for external game controllers. Game controllers offer an alternative form of input to your app. The system automatically directs input from connected wireless keyboards, trackpads, and accessibility hardware to your app’s event-handler code. For game controllers, add support explicitly using the Game Controller framework.
Create custom gestures with ARKit. The system uses ARKit to facilitate interactions with the person’s surroundings. When your app moves to a Full Space, you can request permission to retrieve the position of the person’s hands and fingers and use that information to create custom gestures.
In a Full Space, ARKit provides additional services to support content-related interactions. Detect surfaces and known images in the person’s surroundings and attach anchors to them. Obtain a mesh of the surroundings and add it to your RealityKit scene to enable interactions between your app’s content and real-world objects. Determine the position and orientation of Apple Vision Pro relative to its surroundings and add world anchors to place content.
Create next-level audio and video
Apple Vision Pro supports stereoscopic video to help movies and other entertainment leap off the screen and into the person’s surroundings. Spatial Audio is the default experience in visionOS, so think about how you want to take advantage of that experience.
Update video assets for 3D. Take movie night to the next level by playing 3D movies in an immersive 3D environment. The QuickTime file format supports the inclusion of content that appears to jump right off the screen. Play your movies using AVKit and AVFoundation. Include atoms for stereoscopic content in your movie files.
Incorporate support for Spatial Audio. Build your app’s music player using AVFAudio, which contains the audio-specific types from the AVFoundation framework. Take your audio into another dimension using PHASE, which supports the creation of complex, dynamic Spatial Audio experiences in your games and apps.
Stream live or recorded content. Learn how to create streamed content and deploy it to your server using HTTP Live Streaming. Play back that streamed content from your app using AVFoundation.
Embrace inclusion
Creating an inclusive app ensures that everyone can access your content. Apple technologies support inclusivity in many different ways. Make sure to support these technologies throughout your app:
Internationalize and localize your app. Embrace a global market by localizing your app for other regions and languages. Prepare your app using the Foundation framework, which provides code to format strings, dates, times, currencies, and numbers for different languages and regions. Ensure your UI looks good for both left-to-right and right-to-left languages. Localize app resources and add them to your Xcode project. For information about the internationalization and localization process, see Localization.
Choose inclusive words and terms. Consider social and cultural differences when developing content, and avoid images and terms that have negative or derogatory connotations for portions of your audience. For more information, see Human Interface Guidelines > Inclusion.
Update accessibility labels and navigation. Apple builds accessibility support right into its technologies, but screen readers and other accessibility features rely on the information you provide to create the accessible experience. Review accessibility labels and other descriptions to make sure they provide helpful information, and make sure focus-based navigation is simple and intuitive. See Accessibility.
Support alternative ways to access features. Give people alternative ways to select and act on your content, such as menu commands or game controllers. Add accessibility components to RealityKit entities so people can navigate and select them using assistive technologies.
Add VoiceOver announcements. When VoiceOver is active in visionOS, people navigate their apps using hand gestures. If they enable Direct Gesture mode to interact with your app instead, announcements make sure they can still follow interactions with your content.
Include captions for audio content. Captions are a necessity for some, but are practical for everyone in certain situations. For example, they’re useful to someone watching a video in a noisy environment. Include captions not just for text and dialogue, but also for music and sound effects in your app. Make sure captions you present in a custom video engine adopt the system appearance.
Consider the impacts of vision and motion. Motion effects can be jarring, even for people who aren’t sensitive to motion. Limit the use of effects that incorporate rapid movement, bouncing or wave-like motion, zooming animations, multi-axis movement, spinning, or rotations. When the system accessibility settings indicate reduced motion is preferred, provide suitable alternatives. See Human Interface Guidelines > Motion.
Privacy is important, so keep people informed about how you use their data. If you collect data, offer a privacy statement that explains how you use that information. When you use Apple technologies that operate on personal data, include usage descriptions for the system to display on first use. For more information, see Adopting best practices for privacy and user preferences.
Provide a tangible benefit for any data you collect. When someone agrees to give you their personal information, make sure your app delivers real value in return. Don’t collect someone’s personal data just to have it.
Explain clearly how you use the information you collect. Be transparent with how you use people’s data. When requesting authorization for privacy-sensitive technologies, provide clear usage description strings that help someone understand why you need the data. Explain the data on your app’s page on the App Store.
Secure the data you collect and store. If you do collect data, make sure you protect that data from malicious attacks. Adopt passkeys as a secure alternative to passwords. Store personally identifiable information, financial data, or other sensitive data in the user’s encrypted Keychain. Use on-disk encryption or other Apple security technologies to store other personal data. Use Apple CryptoKit to encrypt data that you store locally or send outside your app.
Test and tune your app
There are multiple ways you can test your app during development and make sure it runs well on Apple Vision Pro.
Test and debug your app thoroughly. During development, debug problems as they arise using the built-in Xcode debugger. Build automated test suites using XCTest and run them during every build to validate that new code works as expected. Run those tests under different system loads to determine how your app behaves.
Be mindful of how much work you do. Make sure the work your app performs offers a tangible benefit. Optimize algorithms to minimize your app’s consumption of CPU and GPU resources. Identify bottlenecks and other performance issues in your code using the Instruments app that comes with Xcode. See Creating a performance plan for your visionOS app.
Adopt a continuous integration (CI) workflow. Adopt a CI mindset by making sure every commit maintains the quality and stability of your code base. Run performance-related tests as part of your test suite. Use the continuous integration system of Xcode Cloud to automate builds, test cycles, and the distribution of your apps to your QA teams.
How to take it further
Once you have an app up and running, look for additional ways to improve the experience. Little things can make a big difference, whether it’s adding a particular feature, or approaching your content in a different way.
Connect people using SharePlay. Sharing and collaboration are an important part of visionOS, so brainstorm which of your app’s activities to make available over FaceTime. Use the Group Activities framework to add support for starting activities and managing updates.
Design SharePlay activities for spatial Personas. Identify moments in your app that can support SharePlay for spatial Personas and synchronize additional details needed to maintain the shared context. For example, you might want to share the scroll position of a window in addition to the window’s contents.
Explore more
Learn more about technologies that provide unique capabilities, yet integrate tightly with Apple platforms to form a seamless ecosystem for apps and games across iOS, iPadOS, macOS, tvOS, visionOS, and watchOS.